Monday, June 24, 2013

Linguine with Bacon and Collards

I love where we live... From May through November, especially, there is a plethora of fresh food available at our fingertips.  We've met the farmers, learned about how they raise their animals, fruits, and vegetables, and it really is a community food experience.  After going to the local Farmer's Market on Saturday morning, the week is really a fun time of experimenting with new recipes and crafting up meals that are wholesome, local, and fresh.

This recipe was initially inspired by this Linguine with Collard Greens and Bacon recipe I found online.  Although my recipe is different, it is similar enough that I feel like I should give credit where credit is due.

Linguine with Bacon and Collards

1.  In a large pan (I use an electric frying pan... You'll need the space!), fry 8 pieces of bacon*.  Remove and set on paper towels to drain but do not drain the pan.  Fry at 350 F, which is the temp you will use for the remainder of this dish.

2.  Toss in 3oz (about 2 large) spring onions*, green and white parts, diced and 1oz shelled pistachios (about 50).  Cook for 5 minutes.

3.  Add in half an apple* (about 2.5oz) and cook for 5 more minutes.

4.  Add in 1 heaping tbsp. minced garlic and 1/4 tsp red pepper flakes.  Cook for 1 minute.

5.  Add 1lb collard greens* in 2 batches.  The first batch, you will rip the leaves into halves and thirds.  Cook for 3 minutes.  The second batch, you will rip into much smaller pieces.  Cook for an additional 3 minutes.  Cover while the cook.

6.  Add 1 cup of water, cover, and cook for 15 minutes.

7.  While the veggies are cooking, boil a pot of water and cook 5.5oz linguine*, for approximately 6-8 minutes or until al dente.

8.  Uncover the veggies and toss in the pasta, along with 4oz (about 1/2c) diced tomatoes* and the bacon, which you've crumbled.  Turn off the heat, but keep it on the hot eye for about a minute before sprinkling about 1/8 cup grated parmesan cheese* (optional) over it.  Remove from heat and serve immediately.


I served this with locally made rosemary bread and soft butter.  This recipe made enough for 4 servings (Peter ate 2, I ate 1, and he had enough for lunch the next day).    We followed it up with homemade pavlova!

Pavlova

One of the easiest and tastiest summer treats!


There are three steps to this: meringue, whipped cream, and fruit.  You can use whatever fruits you want, but we prefer berries (strawberries, blackberries, blueberries, cherries).  Figs and kiwi are awesome, too.

Step 1: Meringue
Heat the oven to 225 F.
In a stand mixer, combine: 5 egg whites and 1/4tsp cream of tarter. Mix with the whisk attachment on medium/6 until the eggs begin to froth, then add in 1 cup white sugar and turn the speed to high.   Whisk until stiff peaks form, about 4-6 minutes.
Spray a pan with nonstick spray, then use a spatula to spread out the meringue. Make sure you make "edges" on the side, to help hold in the cream and fruit.
Bake for 2 hours at 225.  Remove from the oven and cool, at room temp, for 2 hours before beginning Step 2: Whipped Cream


Step 2: Whipped Cream
In a stand mixer, combine: 1 pint heavy cream and scant 1/4 cup brown sugar. (3 tbsp. is actually best).  Using a whisk attachment, whisk on high until whipped, about 5-7 minutes.  You want it well whipped but not stiff. 
Use a spatula and spread the cream out onto your meringue, into the 'basin' you created with your edges.


Step 3: Fruit
Wash and dry your assortment of fruit.  Mix the fruit well together and then cover the top of the whipped cream with it.
Refrigerate immediately.  Serve cold and within 2-3 days (or the cream will spoil). 

Thursday, June 13, 2013

Seared Scallops with Pear Reduction

(I haven't blogged a recipe in a while, but I think this one makes up for it!)

In a cast iron pan over medium heat, combine 2 tablespoons of salted butter and 1 tablespoon lemon-infused olive oil.  When the oil is hot, add a half pound (approx. 8) sea scallops that you've dusted with salt and pepper to taste.  Sear for approximately 2 minutes on each side and remove to a warmer plate or into foil, to keep warm.

Immediately upon removing the scallops, add 2 medium pears, peeled, cored, and diced (overly ripe pears work GREAT for this) and stir vigorously.  Add in 1 tablespoon brown sugar and continue to stir.  If your pears are very ripe, they will start to thicken the reduction, which is what you want.  If they aren't as ripe, make sure to slice them very thin so that they will break up as they soften.  After five minutes, add in 1 tablespoon of Greek seasonings (this can be a mix of oregano, mint, rosemary... anything that is a native Mediterranean herb) and stir well. 

Add in the scallops and cook for 30 seconds before flipping, making sure to keep them coated with the reduction.

Serve immediately (serves 2).

By the time I took this picture, we were already chowing down...


We served this with a cold summer kale salad, potato rolls, and a herbed wild rice.  Needless to say... Peter doesn't have leftovers for work tomorrow. Delicious!

Monday, April 22, 2013

Apple Muffins

1. Preheat oven to 350.  To prepare, dice 2 small-medium apples (I used pink ladies).  Also, mix 1tbsp ground flax with 3tbsp water, and put aside.

2. Mix together:  1.5c AP flour, .5c AP whole wheat flour, 1tsp baking powder, .5tsp baking soda, .5tsp salt.

3. In a mixing bowl, combine and mix on low until well combined: 1/4c plain Greek yogurt, 1/4c unsweetened applesauce, 2tbsp oil, 1 egg, flax mixture (from step #1), 1tbsp vanilla, 2/3c sugar.

4.  Mix in the diced apples (from step #1).

5.  Add the flour mixture to wet ingredients and blend on "stir" setting.  The dough will be very sticky.  Divide into 12 muffin tins.

6.  Mix together: 3tbsp brown sugar, 2tbsp hazelnut meal, 1tsp cinnamon, 1tbsp butter.  Mix with your fingers until crumbly (a cornmeal texture) and sprinkle evenly over each muffin.

7.  Bake at 350 degrees for 25 minutes.

Wednesday, March 20, 2013

Review: Sun Kisses, Moon Hugs

Originally posted here as Review: Sun Kisses, Moon Hugs on 3/20/13

***

I was contacted by the author of the children's book Sun Kisses, Moon Hugs and, although she didn't ask that I review the book, after downloading it and reading it just now (and then rereading it with Bobby), I wanted to pass along both a review and a special offer. Through today, you can download this book to your Kindle (or your phone with Kindle, if you are me) for free. That's right... a nearly $18 book for no charge. And, if you're like me, you'll decide that you need to own this book with its touching message and beautiful illustrations for the little ones in your life, and you'll go back and buy the print version. (It's the librarian in me... I actually need print books. Really.) I only wish we'd had this before I left for TN or Chicago, or before Peter went away on his business trip.

Sun Kisses, Moon Hugs
written by: Susan Schaefer Bernardo
illustrated by: Courtenay Fletcher
Copyright: Inner Flower Child Book, 2012

Click here for the hardcover book
Click here for the digital version, available free through 3/20.

***

This touching tale is a back-and-forth between a child and a beloved adult who are unable to be together. As the child misses their dear one, they are lovingly reminded of all the walls that they can be connected even when they are apart.

"The sun will catch your kiss and use light speed, to forward it right on to me."
"Love is in each sttar twinkling in space and every frostly snowflake licking your face."
"Each grain of sand means I'm in reach..."

The book ends with the a final message of hugs and kisses, telling the precious child "I'll always love you, Little One."

While I think that this book would have been a wonderful read for before (and during) the times Peter and I have been away from the kids, I also think it can be used to explain when someone has passed away. From a librarian's point of view, it was always difficult to find books that worked well to explain how, while death separates us it doesn't mean we can't be together in other ways, for smaller children. I found 2 or 3 that I kept on hand that used common images (like a caterpillar becoming a butterfly for instance) to explain death and leaving, but it wasn't easy to find things that explained and comforted without placating or being too cutesy to really help. And, especially with picture books and the under 6 years old crowd, it's a careful balance.

This book hits that balance. If a parent, grandparent, or sibling dies, it can be hard to explain to a young child that, although this person they love is no longer physically with them, there is still a way to connect: hug a tree and feel your loved one hugging you back, look up at the moon and see the smile of your dear one returned, kisses sliding from heaven down the rainbow. Sun Kisses, Moon Hugs strikes a delicate balance between being a cutesy read and a heartwarming story that both comforts and gives a smile to the little one reading it. Bobby loved it and restarted it (twice) on my phone; I have a feeling that Maya, who often talks about Nicholas, Sophia, and Alexander living in heaven, will also enjoy it.

Long story short, I highly recommend this book, for kids under 6, who either are dealing with a separation of some reason (long term like divorce or short term like a business trip or deployment) or for the death of someone close to them.


This review, in similar form, was also posted on Amazon.com, in the product link. No goods (other than the free Kindle download available to everyone through 3/20) was exchanged for this review.

Thursday, January 24, 2013

Review: Purely Elizabeth Chocolate Chip Cookie Mix

Back when we were pretty much gluten free/dairy free to see if that diet would help Bobby, we stocked up on a variety of different items and brands.  While we didnt care for the Purely Elizabeth pancake/waffle mix at all, and the oatmeal cookies were more of a success with people outside our household, I decided today to try the box of chocolate chip cookie mix.  Gluten free and vegan, I thought I'd compare it to my own recipe.  I love mine waaayyy more, but these cookies weren't bad.

I followed the directions (1/2c oil, 1/4c applesauce, 1tbsp vanilla) and baked them at 350 for 12 minutes.  After cooling for 1 minute, I put them on wax paper to cool.

Because I'm me, I snuck a bite before they were cool and, honestly, I think the just-hot-enough-but-not-mouth-burning cookie tasted better than the cooled one, which had more of an earthy taste and less of the sweet, cookie taste you think of when you think chocolate chip cookie. 

In general, they weren't overly sweet and with their ingredients (millet and almond and garbanzo bean flours, and chia seeds), they are treats you can feel good about eating.  But if I wanted a chocolate chip cookie, I'd probably cook up a batch of my own.  If I just wanted a lightly sweet cookie that had the texture of an oatmeal cookie but the hint of chocolate chip, I'd bake these up again.  They are definitely something to share with the GF, vegan crowd in my life.

B+

(I was not compensated for this review, nor did I recieve any free products of any sort in return for this review.)

Thursday, January 10, 2013

Asparagus Pasta with Saffron Sauce

I initially found this recipe in Classic Vegetarian Cooking, on page 198.  I've modified it from time to time and it works well for two or for eight.  Serve it with some warm bread and a salad and it is divine.  For a lighter option, replace the heavy cream with half and half, or make only half the recipe for the sauce; the somen will soak it up and still be delicious!


Serves 4

1. Soak 1 pinch of real saffron in 2tbsp boiling water.

2. Wash 1 pound of asparagus and trim the tops off, slicing the stalks into small rounds and saving the tops (about 2 inches). 

3.  Melt 2tbsp butter over medium heat.  Add 2 diced shallots (or 2 small sweet onions) and saute until soft.  Add 2tbsp white wine, 1 cup heavy cream, and the saffron infusion.  Bring to a boil, reduce, and simmer gently until the sauce thickens and coats the back of a spoon (around 5 min).  Add the juice of half a lemon and the zest of half a lemon, with 1tsp salt and 1tsp pepper.  (You may add more salt/pepper to taste when it is done).  Remove from heat.

4.  Bring a large pot of water to a bnoil and blanch the asparagus tips before removing them and adding them to the sauce.  Add the asparagus rounds and 1 cup peas to the boiling water and cook for 7 minutes or until tender.  Remove with a slotted spoon and add to the sauce.

5.  Cook 12oz somen noodles in the water for 3 minutes or until tender.  Drain.  Pour the sauce over the drained noodles.  Stir well to coat and sprinkle with grated parmesean cheese (optional) before serving.


***For a vegan alternative, use a nondairy butter like Earth Balance and Mimic Creme (a cashew and almond cream alternative) and remove the parm cheese at the end.

Review: Whitmor 12-Bin Organizer

Whenever you write a review the really, really endorses an item, it sounds like you were paid to do it.  And, if you were paid, it sounds contrived.  I wasn't paid for this review, nor did I get anything in return for reviewing this item.  I actually bought it earlier in the week and I just really dig it.  So I thought I'd share.


I live under the false illusion that I am organized.  Of course, for months, my idea of living room organization (as it relates to the kids toys) is this Sterlite bin that I kept under the train table.  The kiddos would randomly (and not even to play with anything) dump it in the floor.  It drove me nuts.  But, it was easy enough to just throw all the trains, cars, tracks, etc in it when someone was coming over.  In spite of the fact that it was unorganized and didnt look all togethern neat... But hey!  Trains and cars (that REALLY hurt when you step on them) weren't in the floor, so I'm organized. 

Honestly, it got to the point this week (probably because a fair amount of my time is spent loving the couch) that the sound of the metal and wood and plastic crashing to the floor, the kids standing on the bin just for fun, and the all around lack of 'neat' look took me down.  I just couldnt take it anymore.  So I pulled up my trusted buddy, Amazon, and looked for some sort of storage.  I wasn't sure what I'd get but I needed something... I wanted the living room to look more organized (I mean, it's the twins' living room too, so I didnt want to banish their living room toys to the playroom because I couldnt deal) and I just wanted something that looked (and was) more organized.  Enter the bin system.

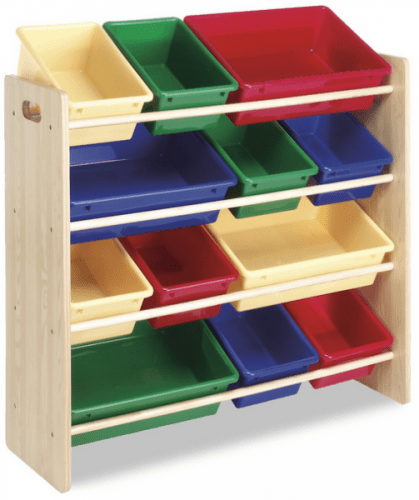
I looked at a few and, because I'm anal, read all the reviews and I opted to get the Whitmor.  At an Amazon price of $55 (retail listed as $90), it was cheaper than all the other bin organizers and it had the best reviews (4 out of 5 stars).  I even opted, with my Prime, to overnight it for $4 because I.WAS.DONE.  I needed something and I was on the verge of meltdown central.  (I know, it sounds crazy to be this UP over something so pointless but hey... I am me... This is how I roll.)  I ordered it Monday afternoon, it arrived Tuesday afternoon and, after my run and while our neighborhood babysitter was still here with the kids, I unloaded the box, which consisted of 2 MDF side panels, 8 metal rods, 16 screws (17 actually), 4 large bins, and 8 small bins.

No kidding: in 15 minutes, it was assembled.  The poles lined up to predrilled holes and I screwed in the one side before laying the second side on top of the poles and screwing those in.  All while carrying on a conversation.  It was a breeze.  Then, we slipped the bins into place and voila!  Ready to go.  I organized the toys and decided to count down how long it would take for at least one of the bins to end up on the floor.

I'm still waiting.

For whatever reason, Bobby and Maya dig this.  Maybe it is the primary colors.  Maybe it is because they can now find their different types of trains and cars.  Who even knows.  They take toys out and play with them, but no throwing, no mess.  And, when they are done, they have started putting them back!  (When they havent, I have put them back, but even my stress about cleaning up has dropped- probably because I'm not cleaning up what seems like a billion small trains/cars!)  It looks wwwaaaayyyy better and it even inspired me to move their chairs up and put their train table behind them (instead of in front, where it worked almost like a psuedo-coffee table to the main living area.  Now, it's almost like our living room has been divided into "living room" and "play area", which is nice.

But the mess... Oh the mess... Or lack there of!  THANK YOU!

It is made out of MDF (which isnt great but lends to the fiscality of it) but the metal rods seem stable (not enough to have little monkeys climb on but to able to do the job they are fine).  The bins are a good, hard plastic, which I think would work well even if we didnt have the organizer anymore.

Did I mention it cleaned up the clutter? 

So... if you have little ones (or you do lots of crafts) and you want something that is easy to put together, wont break the bank, and is very functional (and may even inspire your little guy or gal to clean up after themselves), I highly recommend this.  I even gave it 5 stars on Amazon, so you know I like it!